| << return to blog entries
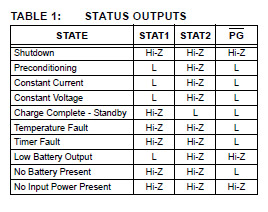
2010-05-22 07:01:55 (6517 views) The new battery charging circuitry makes 3 lines available, in most cases these are used for LED indicators. We have

"L" in this table means "ON" and the LEDs or signal lines are otherwise OFF. Until last night we had three LEDs all hooked up to the charging IC, giving the remote a total of 6 LEDs. However because the placement of these LEDs is severely restricted due to the number of components already on board, they ended up being lined up in the middle of the remote with unpleasant aesthetic results.
Displeased by that we've now removed two of the LEDs and will rely exclusively on STAT1. This is ON when
- the battery is charging
- there was a temperature or timer fault (shouldn't happen by design)
and will deactivate when the battery has been fully charged. When the battery is fully charged the remote will function from USB power (in fact you could just leave it hooked up forever if you wanted to, but remember USB is used only for power and the remote cannot be accessed programmatically like the DL2K-LINK can).
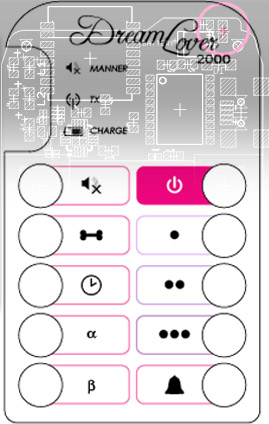
The question was where to place this extra charging status LED. So we've moved away the ON status indicator, and moved up manner mode and TX. The 3rd LED is now STAT1, the charging indicator. As for the ON status indicator, this was placed under the thunder in the logo. The thunder will be transparent on the overlays and the polycarbonate enclosure will either have a hole there or that portion will not be painted. So the thunder will light up when the device is on. Pretty cool.

There is one more function to the STAT1 pin, which is only available on one variant of the charging IC we're using, that of "low battery output" (LBO). It is unclear whether this indicator would be useful or not. Right now our supplier only has the non-LBO version of this chip. Someone has posted before asking whether the remote couldn't detect a low battery, presumably with the intent of achieving virtual leash mode from the remote control as opposed to using the DL2K-LINK USB interface.
Well, where we stand now is:
- even if we used the LBO enabled charging IC the microcontroller doesn't have enough inputs to sense its signal
- experimentation reveals that the remote control's LEDs will cease to function much earlier than the RF circuitry, effectively serving as a battery low indicator of sorts
- the danger with remote control activated virtual leash mode is that if the remote runs out of batteries the receiver will think it's out of range and continue to inflict maximum intensity shocks
- however at this point the remote's battery can be recharged, so this may not be a big problem, just charge fully before playing with virtual leash
Bottom line virtual leash from the remote is possible, just have to be careful how you use it. We haven't done detailed quiescent current measurements on the remote control; if we neglect the current used by the circuitry in 'sleep mode' (when the remote is seemingly off but listening to key presses) the battery theoretically has enough juice to transmit 45000 times. We'll publish oscilloscope measurements of current consumption soon; but chances are the remote will be able to go at least a month without recharging, likely 2-3 months, of course depending on usage to some extent. In this case unless you're really out of juice on the battery you should be able to do virtual leash mode with total safety.
As this is written we realize we haven't even scratched the surface of what will be possible software-wise with this product given our firmware upgrades and the DL2K-LINK. We're just focusing on getting the hardware done - that will be the beginning. The DL2K-LINK is power amplified and can be used as a "relay", multiple units can even be programmed to extend range in large houses or through a number of thick walls or outdoors. The remote control could communicate with the DL2K-LINK through the customizable buttons to set the units into some pre-determined state.
Comments
Post new comment
 |


I am not looking to cause any trouble I applaud the work you have done. I just thought this may be easy as it doesn't require another button, just a addition to the power up power down routines, and I have no idea if you have the spare capacity in the receiver of another on/off gate in the circuitry.
Thank you also for this forum.
By doing as you propose:
1. you'd have to wait 10 seconds after turning on the remote before you can operate it
2. if the receiver is not in range when you turn on the remote all subsequent activations will fail until you cycle power to the remote with the receiver in range
3. you'd introduce complexity in the wireless link where you can no longer be sure packets are received when the receiver is in range given a certain transmit length (especially for the dl2k-link which is web activated and should be ready to transmit all the time)
Overall the benefits of responsiveness and keeping the data link simple seem to matter more than further extending battery life given that the latter is already around the 3 month mark